

Realistic Portrait Sculpting: Capturing Presence, Not Just Likeness
Part of the "ZBrush Digital Sculpting Techniques" series. If you haven't already, read "Sculpting Realistic Facial Features: Proportion and Structure" first — this article builds on that structural foundation and moves into the layer above it.
Why your sculpt looks "like him, but isn't him"
Almost everyone who's done realistic portrait work has lived through this moment. You've checked the proportions a dozen times. The silhouette overlays line up with the photo almost perfectly. Then a client or a friend looks at it and says: "Yeah, it looks like him... but something's missing."
That missing something is presence — the shen tai, the life in the face.
Here's the core argument of this article: likeness is the copying of static geometry; presence is the capture of dynamic traces. Likeness is a measurement problem. Eye spacing, nose length, zygomatic width — those are objective numbers, and if you grind away at your three-view references long enough, you'll get there. Presence can't be measured. It lives in the asymmetry between the left and right sides of the face. It lives in the residue that habitual expressions leave on the muscles. It lives in millimeter-scale relationships around the eyes. And those three things are exactly what gets systematically erased the moment we sculpt with Symmetry turned on in ZBrush.
Put another way: the workflow that chases likeness naturally kills presence. Once you understand that, you understand why this article splits the process into two distinct phases — build the form symmetrically, then break the symmetry to bring it to life.
Part 1: What "presence" actually is
"Presence" sounds mystical. It isn't. Break it down and you get three concrete, workable layers.
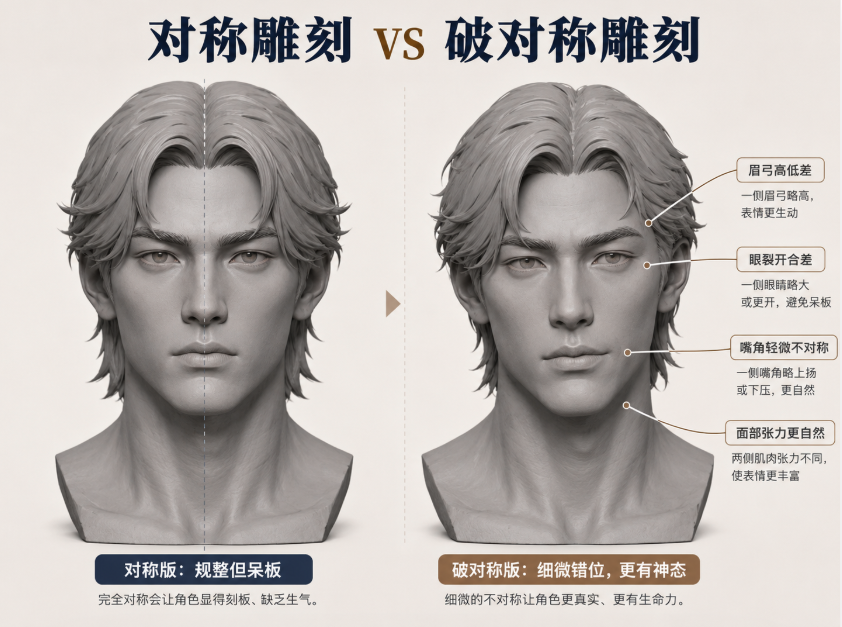
1. Asymmetry: every face is two faces stitched together
No real face is symmetrical. There's a classic experiment: take a frontal photo, mirror the left half into a complete face, then do the same with the right half. You end up with two strangers. What that tells us is that our recognition of a person depends heavily on their unique pattern of asymmetry.
The usual suspects:
- Brow height difference. Most people have one "expressive brow" that habitually sits higher, with a more active frontalis above it.
- Eye size and aperture angle. One eye is usually slightly smaller and slightly more narrowed, and the tilt of the line from inner to outer canthus differs between sides.
- Mouth corner height and philtrum drift. Which side someone chews on, which side they smile with — that determines the depth of each mouth corner and nasolabial fold.
- Nasal and jaw deviation. A deviated septum or a stronger masseter on one side gives the facial midline a subtle S-curve.
Individually these differences sit within a few millimeters. Stacked together, they form a person's facial fingerprint.
2. Expression residue: the muscles remember
Someone who spends years frowning in concentration carries faint vertical creases between the brows and a slight bulge over the procerus, even at rest. Someone who laughs a lot keeps sharper nasolabial folds and visible crease directions at the outer orbicularis oculi even when the face relaxes.
This is expression residue — the permanent marks that habitual expressions carve into soft tissue. It's the final link in the "inside-out" sculpting principle: the skull sets the major forms, the muscles set the surface undulation, and decades of this person's expressive habits set the micro-terrain of the soft tissue. When you sculpt a neutral head, you're really sculpting the average of every expression that face has ever made — not a blank slate.
Practically, this means your reference hunt should deliberately include candids of the person mid-laugh, mid-frown, mid-sentence. Study which creases, folds, and bulges leave a trace after the expression fades, then sculpt those traces into the neutral face at roughly 20–30% strength.

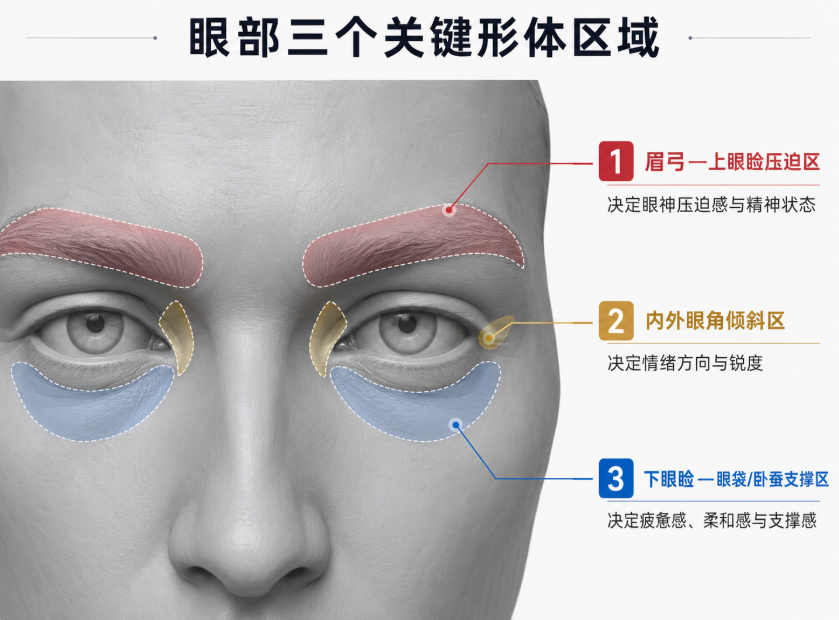
3. The eye area: where presence carries the most weight
Viewers spend far more time looking at the eyes than anywhere else on a portrait, and the eye area also happens to be where the forms are densest and the tolerance for error is lowest. A few relationships that decide the "look" in the eyes:
- How much the upper lid covers the iris. How far the upper lid overlaps the top of the iris determines whether someone reads as alert, sleepy, or melancholic. Half a millimeter changes the entire temperament.
- Lower lid tension. The lower lid isn't just hanging there passively. When the orbicularis oculi tightens, the lower lid pushes up (the hallmark of a genuine smile); when it relaxes, it sags. Its resting position at neutral encodes the person's default mood.
- The lid crease and orbital fat. Age and fatigue are written almost entirely here.
- Subtle gaze divergence. Real eyes aren't perfectly parallel — there's a natural outward splay of roughly 3–5°. Perfectly parallel eyeballs are one of the main sources of that "doll" look.
Part 2: Reference — one frontal photo is nowhere near enough
Presence is a dynamic trace, so static reference only solves likeness. Dynamic reference solves presence. Collect in this order of priority:
- Video. Interviews, talks, vlogs. Watch which mouth corner moves first when the person speaks, how the eyes change when they laugh, where the brows sit by default when they think. Frame-by-frame screenshots beat any posed photo.
- Candids over posed shots. In posed photos people unconsciously "straighten themselves out," actively smoothing away their asymmetry. Candids preserve the real muscle habits.
- Multiple angles and lighting setups. At minimum: front, three-quarter, profile, and up/down angles. Side-lit and top-lit photos expose micro-forms that flat lighting hides completely.
- Photos from different decades. Comparing young and current photos shows you which creases came with the bone structure and which were carved in later by expression residue.
While organizing your reference, build a dedicated asymmetry checklist: item by item, note the left–right differences in the brows, eyes, mouth, and nose. Late in the sculpt, you'll verify against it line by line. That checklist is your blueprint for presence.
Part 3: The ZBrush workflow — symmetrical first, then break it
The workflow has two cleanly separated phases with an explicit switching point. Don't bounce back and forth between them.
Phase 1: solve likeness with Symmetry on
With Symmetry enabled (X axis), use Move, ClayBuildup, DamStandard and the other core brushes (see "ZBrush Core Brushes and Their Applications" for brush choices) to nail down:
- Skull mass and feature proportions, following the structural method in "Sculpting Realistic Facial Features: Proportion and Structure"
- The characteristic forms of the features — the "averaged version" of this person's nose shape, eye shape, and lip shape
- Silhouette overlay checks against the reference photos
The goal of this phase is a symmetrical person who looks like him. Do not move into the asymmetry phase until the proportions are locked. If you change proportions later, you'll destroy every carefully placed asymmetry along with them.
Phase 2: turn Symmetry off and inject presence
This is the heart of the article. Before switching Symmetry off, take two insurance measures:
1. Store a Morph Target (Tool → Morph Target → StoreMT). This snapshots the current symmetrical state. If any asymmetry pass goes too far, you can locally erase it back with the Morph brush instead of undoing everything.
2. Create a sculpting layer (Tool → Layers). Record all your asymmetry work on its own layer, and the layer intensity slider becomes a "presence dial." Client thinks it's too much? Pull it to 0.7. Too flat? Push it to 1.2 (using the layer intensity-ceiling trick). Far more flexible than destructive sculpting.
Then work through your asymmetry checklist item by item:
- Use Move for the big displacements. Push one brow up as a whole, pull one mouth corner down, nudge the midline into its S-curve. Base the amounts on your photos — but deliberately overshoot to about 120%, then dial back with layer intensity. Asymmetry that's too subtle gets auto-corrected by the viewer's brain, which means it might as well not exist.
- Use Transpose/Gizmo to rotate the eyeballs independently. Adjust each eye's aim separately to build in that 3–5° natural divergence, and lift the upper lid slightly on the "expressive eye" side.
- Use DamStandard plus Inflate for expression residue. Following your analysis from earlier, lightly carve the glabellar creases, the nasolabial fold difference, the beginnings of crow's feet. The target strength: barely visible under flat light, clearly readable under side light.
- Use Standard at low intensity for soft-tissue sag. Gravity works on the face asymmetrically too — the side someone habitually sleeps on is looser. Left–right differences in the tautness of the cheeks, jawline, and under-eye area are a high-level realism cue.
Part 4: Four tests — did the presence land?
Every sculptor goes visually blind to their own model. These four tests force a reset of your judgment:
- The squint test. Squint at the model. Detail gets filtered out and only the big relationships remain — and presence is carried mostly by big relationships. If it "feels wrong" while squinting, the problem is in the forms, not the fine wrinkles.
- The flip test. Mirror the viewport or a screenshot horizontally. Your brain autocompletes images it knows well; flipping breaks that instantly, and any awkward asymmetry jumps right out.
- The silhouette and side-light test. Switch to a Flat material to check the silhouette, then throw a single side light to read the micro-forms. These check silhouette recognizability and the strength of your expression residue, respectively.
- The blind test. Send a screenshot to a friend who knows the person (or the character). No hints — just ask "what do you think he's thinking right now?" If their answer lands close to the mood you meant to convey, the presence is working.
Part 5: Common mistakes
- Sculpting with Symmetry on from start to finish. The most common mistake and the most fatal one. It produces doll faces.
- Random asymmetry. Asymmetry has to come from reference analysis. Pushing things around by feel doesn't read as "lifelike" — it reads as "sculpted crooked."
- Skipping proportions and jumping straight to presence. Without the foundation, presence has nothing to attach to. Likeness is the prerequisite for presence, not its opposite.
- Substituting fine wrinkles for form. Pore and wrinkle maps can't rescue broken forms. This matches the "each detail frequency does its own job" principle from "High-Poly to Low-Poly: The Complete Topology and Decimation Workflow" — presence lives in mid-frequency form, not high-frequency detail.
- Modeling the eyeballs as perfectly parallel standard spheres. The number-one source of doll-face.
Closing: from copying a face to understanding a person
Capturing presence ultimately means restoring your subject from "a set of geometric data" back into "a person with an expressive history." The skull gave him his major forms, the muscles gave him his surface, and decades of joy and frustration gave him his asymmetry and expression residue. Inside-out — and the final layer you sculpt is time itself.
To truly control expression residue, you need to know which muscle sits behind each crease: glabellar lines come from the corrugator, the nasolabial fold is pulled by the levator group of the upper lip, and crow's feet are the work of the orbicularis oculi.

Comments (0)