

Almost every self-taught sculptor hits the same wall. You know your brushes. You've laid in pores, wrinkles, all the surface work. And the finished head still looks off—not obviously broken, just subtly wrong in a way you can't put your finger on. Here's the uncomfortable truth: the problem is almost never the detail. It's the proportion and structure underneath.
A believable face isn't built by piling on pores and creases. It's built on a correct skull, accurate feature placement, and well-defined facial planes. Get that foundation right and the head will read as a real person even at the mid-poly stage, before you've touched a single skin detail. Get it wrong and every bit of detail you add is just error stacked on top of error.
This guide walks through the work in the order you should actually do it: overall head shape, then skull structure, then proportions, then the internal logic of each feature, then a practical ZBrush workflow, and finally the mistakes to watch for. Think of it as the "what to sculpt" half of the equation—it pairs naturally with a brush reference, which covers the "what to sculpt it with."
1. Establish the head shape before you touch a single feature
The first mistake nearly everyone makes is diving straight at the eyes, nose, and mouth while the head itself is the wrong shape. Sculpting always runs large to small: decide what shape the head is, then drop features into it.
The classic Loomis approach is the cleanest way to think about it—a sphere for the cranium with the sides shaved flat, joined to a wedge for the jaw. Translated into volumes:
- The cranium is roughly a sphere, but flattened on both sides. Those flat zones are the temporal planes around the temples.
- The face hangs off the front and bottom of that sphere, with the jaw forming the lower wedge.
- From the side, a head is nearly as deep as it is tall—close to a slightly squashed square. Beginners almost always make the head too flat front-to-back, and that lack of depth is one of the biggest reasons a profile reads as fake.
In ZBrush you can start from either end. From a primitive: drop a Sphere3D, convert to PolyMesh3D, turn on DynaMesh at a low resolution (around 128), and pull the jaw and chin down with the Move brush until you have a clean egg-shaped silhouette. From a base mesh: grab something premade—the bundled Demo Head works fine—and reshape it, which keeps your proportions and topology under control from the start. Either way, the only goal here is a correct outline: width from the front, depth from the side, and the overall run from jaw to crown. Don't touch feature detail. And turn on X-axis symmetry (press X) so you're working both sides at once.
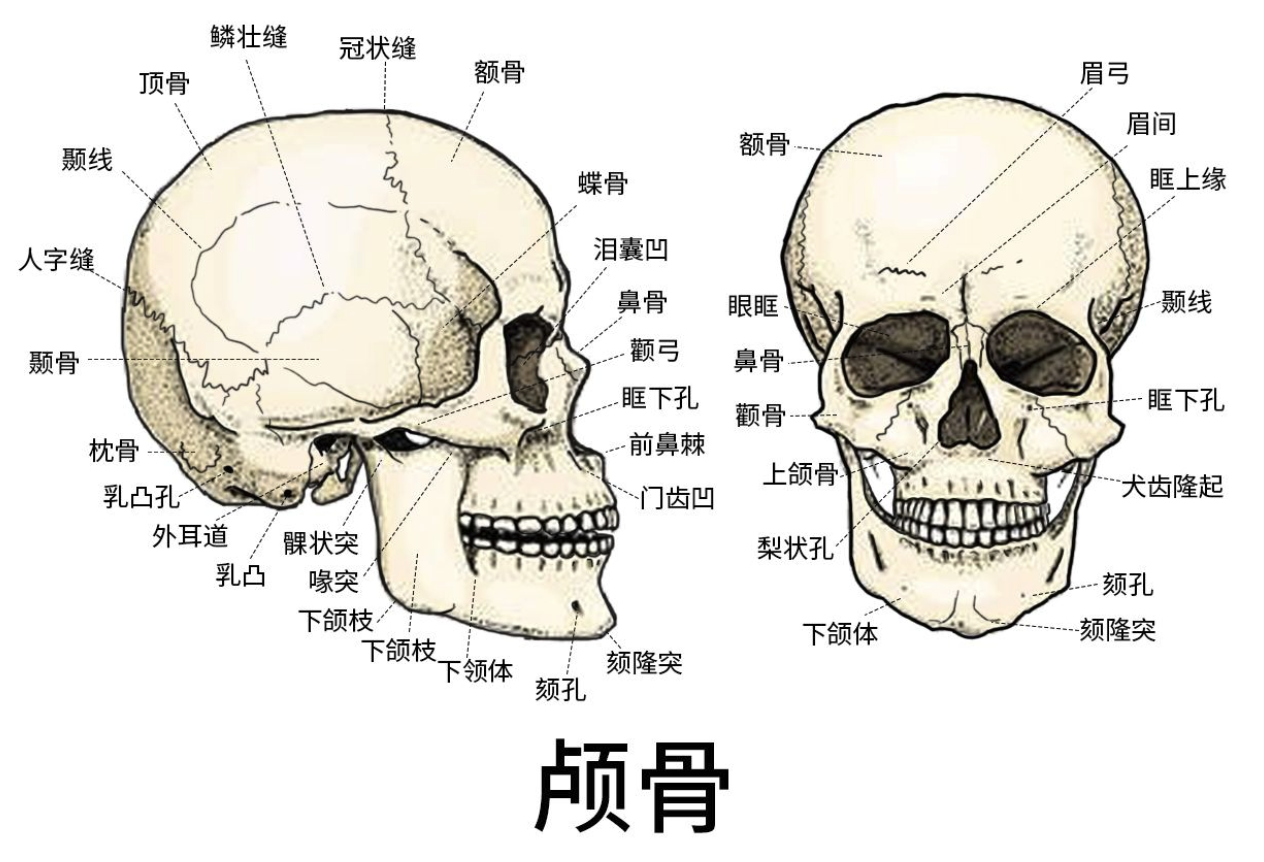
2. Skull structure is where realism actually comes from
A realistic head reads as human because the viewer can sense the bone underneath the skin. Where the skin is thin—forehead, cheekbones, jaw, bridge of the nose, brow—the bone pushes right up against the surface. Where it's thick, padded with fat and muscle—the cheeks, the temples—things stay soft. Place the bony points correctly and the face's hardness, its age, and its sense of gender all fall into place almost on their own.
The landmarks worth knowing and building as actual volume changes at the mid stage:
- Frontal eminences—the two soft bumps on either side of the forehead that define its shape.
- Brow ridge—the horizontal bony shelf above the eyes. It's heavier and more squared off in men, and the shadow it casts over the eyes is central to both expression and gender.
- Temporal fossa (the temple)—a large flat, even slightly concave plane on the side of the head. Round this out too much and the whole head turns into a ball.
- Zygomatic (cheekbone and arch)—one of the most important horizontal landmarks; it sets the width of the face and whether the cheekbones read as high. The arch sweeps back toward the front of the ear.
- Maxilla—the support beneath the nose and beside the nostrils that gives the midface its fullness.
- Mandible and the angle of the jaw—what makes a face square or round, and gives the lower half its strength.
- Chin—the bony prominence at the front of the jaw.
A tip from working sculptors: treat the skull as a set of large planes of the face—frontal, temporal, zygomatic, masseter, mandible. In ZBrush, use Trim Dynamic or hPolish to literally cut these planes into the form, then soften the transitions between them. Build the blocky version first and round it off second. It's far more reliable than trying to massage a sphere into a face.
3. Proportion: the rule of thirds and fifths
Once the skull stands up, you place and size the features—the stage that's easiest to get wrong and matters most for likeness. The proportions below describe a standard adult face from the front. Treat them as a starting point: every real face deviates, but learn the standard before you break it.
Vertical thirds divide the face from hairline to chin into three roughly equal bands:
- Hairline to brow
- Brow to base of the nose
- Base of the nose to bottom of the chin
Horizontal fifths: the width of the face is about five eye-widths across. The gap between the eyes is about one eye-width, and the distance from each outer corner to the side of the head is about one more.
A few placements get overlooked constantly and are worth burning into memory:
- The eyes sit at the vertical midline of the whole head—halfway from the crown to the chin—not the midline of the face. Beginners place them too high almost without exception, because it's easy to forget the big mass of cranium sitting above the brow. This is the number-one cause of a fake-looking head, no contest.
- The ears fall between the brow line and the base of the nose, and they tilt back slightly.
- Nostril width is roughly equal to the distance between the inner corners of the eyes.
- The mouth sits in about the upper third of the gap between nose and chin, with the corners aligning roughly under the inner edges of the pupils. Leave room below the lower lip before the chin—don't drop the mouth too far down.
And don't let a good front view lull you—a face can still fall apart in profile. Set the ears back in the rear half of the head's depth, not the center. Make sure there's enough distance from the nose tip to the back of the skull (again: depth close to height). And spend real time with the Move brush on the profile line itself—the silhouette of forehead, nose, lips, and chin—because that single curve makes or breaks the side view.
4. The internal logic of each feature
Knowing where things go isn't enough. Every feature has its own volumetric logic, and once you understand it you stop sculpting features that look like parts glued onto a face.
Eyes: lids wrapping a ball. The single most important idea here is that the eyeball is a sphere, and the lids are two flaps of skin with real thickness draped over its surface. The classic beginner error is carving an almond-shaped slit into a flat plane, which leaves the eye looking sunken and dead. Instead, set the spherical volume of the eyeball into the socket first, then wrap the lids around that curve. The upper lid covers more of the ball and casts a shadow, and its edge has thickness. The outer corner usually sits a touch higher than the inner one. The high point of the upper lid leans toward the inside while the low point of the lower lid leans toward the outside—the two arcs are offset, and that offset is what gives an eye its life. And the inner corner holds the caruncle, that small pink fleshy nub, so don't finish it as a sharp point.
Nose: bone plus cartilage. The top third is bone (hard); the lower two-thirds is cartilage (softer, springy). Structurally it's the bridge, the ball of the tip, the two wings (alae) on the sides, and the septum down the middle. The nostrils aren't two simple holes—they're openings that face down and outward, shaped by the alar cartilage. The easiest mental model for the tip is one ball with two smaller balls (the wings) flanking it.
Mouth: lips wrapping the curve of the teeth. Same principle as the eye. The teeth form a cylindrical arch, and the lips are muscle laid over that arch—so the mouth isn't two flat strips stuck on a plane, it curves around the dental arc. That's exactly why the corners wrap back into the face. The upper lip has an M-shaped outline with the tubercle in the center, topped by the philtrum and its two ridges. The lower lip is usually fuller, easiest to read as two soft pads side by side. The corners (the modiolus) tuck in slightly with a small dimple—don't finish them as two lines meeting in a sharp point.
Ears: messy-looking but predictable. An ear seems chaotic, but its structure is fixed: the helix is the outer rim, the antihelix is the Y-shaped fork inside it, the tragus is the little bump at the front, the concha is the deep central hollow, and the lobe hangs below. Sculpt it as a set of nested Y- and C-shaped grooves and it stops being intimidating. Position, once more: between the brow line and the base of the nose, tilted slightly back.
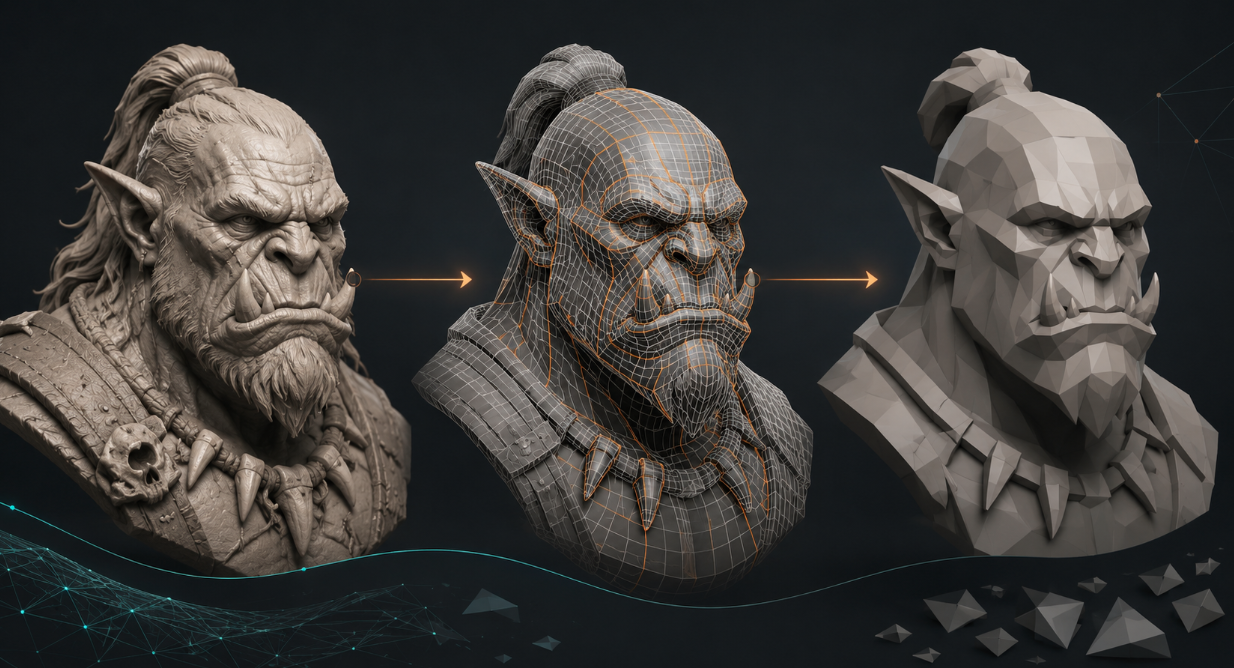
5. A ZBrush workflow, coarse to fine
Here's how all of this lands in the software. The whole thing rests on one rule: fully resolve the form at each stage before moving to a finer one.
Step 1 — Block the big form. Sphere3D to PolyMesh3D, DynaMesh around 128. Pull out the overall head shape and jaw depth with Move. Symmetry on. Judge nothing but the silhouette.
Step 2 — Lock proportions. Against the thirds and fifths, use Move to rough in the position and size of the eyes, nose, mouth, and ears—crude blocks are fine, don't shape them yet. Rotate constantly and flip between front and profile to check. The time you spend here pays for itself many times over.
Step 3 — Build the facial planes (mid-model). Use ClayBuildup to add the volume of the cheekbones, brow ridge, and jaw, then Trim Dynamic and hPolish to cut the major planes—frontal, temporal, zygomatic, masseter, mandible. You're after blockiness and structure here. Square first, round later.
Step 4 — Retopologize. Once the form is broadly right, run ZRemesher for clean, even topology, then subdivide (Ctrl+D, or add levels in the Geometry panel) to get the resolution you need for refinement.
Step 5 — Refine the features. Move to nudge feature position and volume at higher resolution. ClayBuildup to keep adding mass—lid thickness, lip volume, the wings of the nose. Dam_Standard for crisp transitions and creases: the eyelid fold, the lip line, the alar groove, the corners of the mouth, the channels of the ear. It's your workhorse for realistic feature transitions. Standard and Inflate for soft swells like the puff under the lower lid or the lip tubercle. And Smooth (hold Shift) sparingly—only to take the edge off something that's gotten too hard. Drag it everywhere and you'll wipe out the structure you just built.
Step 6 — Skin detail (last). Pores, fine lines, blemishes—this is the decorative top layer. Surface Noise, alpha maps, the Standard brush with Spray turned on. To say it one more time: this step only means anything once the form from the first five steps is genuinely right.
6. The mistakes beginners hit most
Tape this list to the edge of your monitor and do a quick pass after each session:
- Eyes too high. They belong at the vertical midline of the whole head; there's a lot of skull above the brow.
- Head too flat. In profile the depth should be close to the height.
- No bone in the head. Don't treat it as a soft ball—let the bone push through where the skin is thin (brow, cheekbones, jaw).
- Eyes and mouth as decals. Lids wrap a ball; lips wrap the dental arch. Both are wrapping relationships, not slits cut into a flat surface.
- Temples too round. The temporal plane is flat to slightly concave.
- Detailing too early. Carving pores before the big form stands up is just wasting effort on the wrong shape.
- Over-smoothing. Smear the structure flat and you get a bar of soap.
- Dead-perfect symmetry. Turn symmetry off at the end and introduce small asymmetries—slightly different eyes, an uneven set to the mouth corners. No real face is perfectly symmetrical.
The short version
A believable face is correct skull masses, plus accurate feature proportions, plus structured facial planes. Detail is just the finishing touch on top of all that. Next time you sculpt a head, force yourself not to pick up a single detail brush until the form is right—you'll watch the credibility of the result jump a whole level.

Comments (0)